Article
Top 5 Easy Kid-Friendly Sandwiches for Busy Mornings
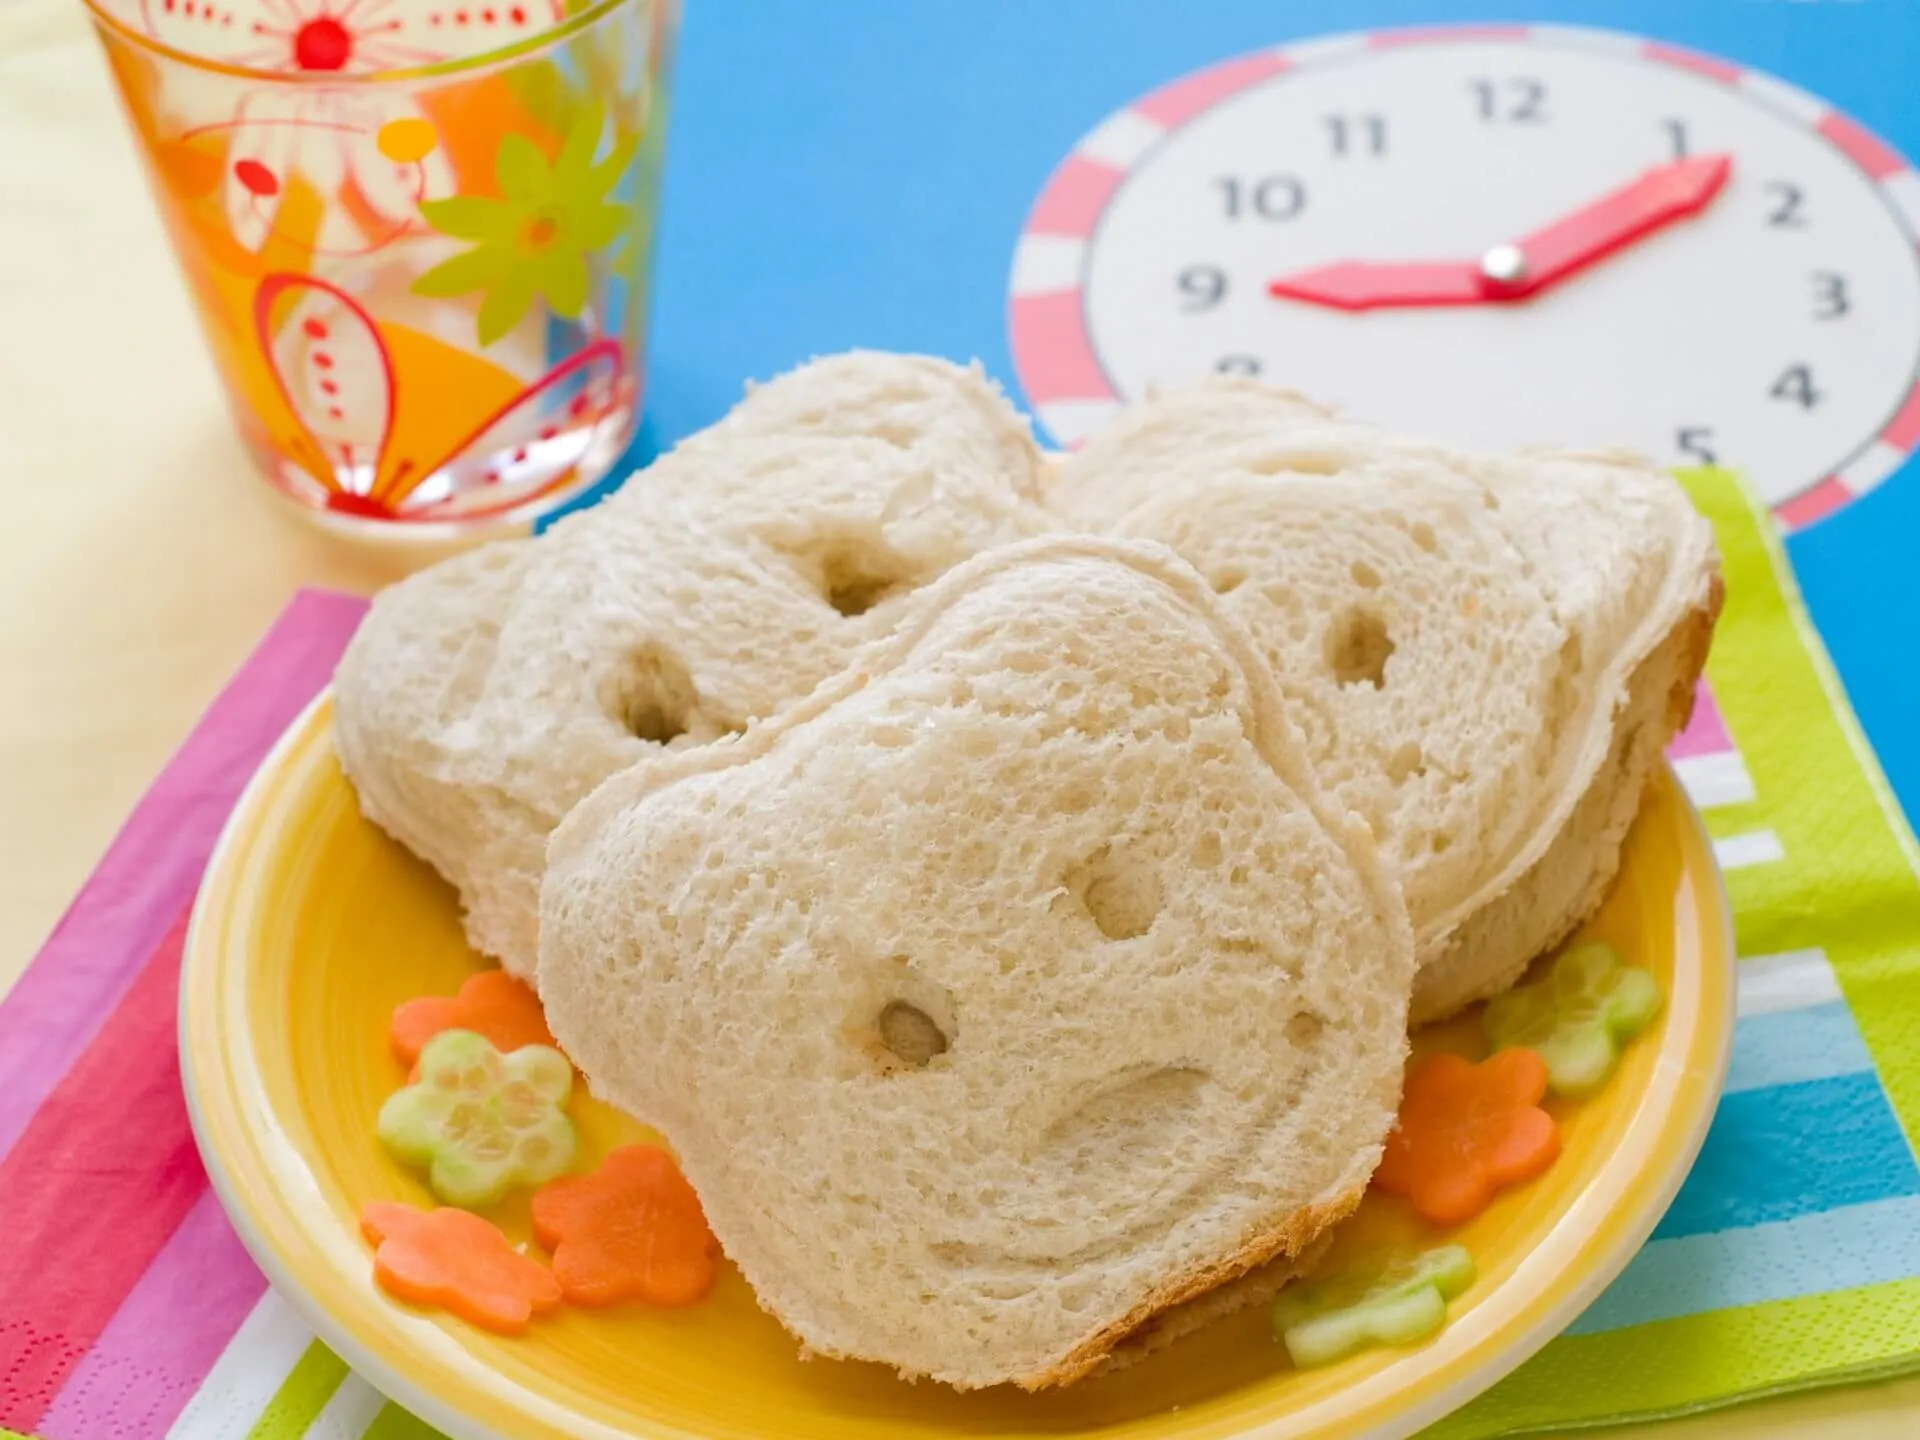
When it comes to kids’ lunches, sandwiches are a classic for a reason. They’re familiar, customisable and easy to make. Kid-friendly sandwiches are all about keeping flavours simple, textures manageable, and options flexible enough to suit even the fussiest eaters. Research shows that children are more likely to eat foods with familiar flavours, especially during picky eating phases, which makes sandwiches a low-pressure win for parents.The best part? Kid-friendly sandwiches don’t have to be boring. With the right choice of bread, some gentle fillings, and a bit of fun presentation, they can become your most reliable go-to for school lunchboxes or busy days at home.Read on for some easy, fuss-free kid-friendly sandwiches that are practical, flexible, and designed to help your little ones feel a lot more confident at mealtimes.Make Sandwiches Healthy, Fun and Stress-FreeGetting kids to eat balanced meals doesn’t have to be a struggle, even with simple favourites like sandwiches. Healthy Parents, Healthy Kids by Dr Nick Fuller is packed with practical strategies to make mealtimes enjoyable, help children explore nutritious foods, and reduce the stress of picky eating.Turn everyday sandwiches into healthy, fun meals. Grab your copy of Healthy Parents, Healthy Kids today and make mealtimes calmer, happier, and more enjoyable for the whole family.Choosing the Best Bread for Kid-Friendly SandwichesFinding the right bread is often half the battle. Many kids are sensitive to textures; anything too grainy, crusty, or ‘seedy’ can be an immediate dealbreaker. If you’re dealing with a picky eater, sticking to soft, smooth textures is a great way to make the sandwich feel ‘safe’ and approachable. Once they’re comfortable, you can slowly experiment with different types, but starting with what they love is the best way to build confidence.Some soft, easy-to-love options include:Soft wholemeal or sourdough (great for a gentle fiber boost)Milk bread or potato rolls (perfectly soft for little teeth)Whole-grain wraps or pita pocketsEnglish muffins or soft sandwich thinsFilling Ideas They’ll Actually LoveThe filling is where the magic happens! If you’re looking to boost the nutrition without a mealtime struggle, try finely grating ‘hidden’ veggies into familiar favourites. It’s a genius way to add extra goodness without changing the texture kids love.Give these simple, protein-packed combos a try:Shredded chicken mixed with a little mayo and very finely grated celery or carrot.Cream cheese topped with paper-thin cucumber slices.Smashed boiled egg with a tiny bit of Greek yoghurt.Simple cheddar slices or mild turkey breast.Tips for a Perfect, Non-Soggy LunchboxThere’s nothing worse than a soggy sandwich. Here are a few quick tricks that can help keep your kid-friendly sandwiches fresh and appetising until lunchtime:A thin layer of butter or cream cheese acts as a waterproof seal, keeping the bread from getting soggy from the fillings.Always pop an ice pack in the lunchbox to keep meat and cheese fresh and the bread firm.Avoid overfilling the sandwich; it makes it much easier for little hands to hold without everything falling out.Use a fun cutter or simply cut into fingers (soldiers) to make the sandwich look more inviting and easier to manage.Top 5 Kid-Friendly Sandwich RecipesThese top 5 kid-friendly sandwich recipes are easy to make, tasty, and designed to please even the fussiest eaters. From hidden-veggie favourites to cheesy classics, there’s something here for every lunchbox and snack time.Egg Pesto Melt A warm, gooey sandwich packed with protein and flavour, creamy egg and vibrant pesto melt perfectly together for a fuss-free kid-friendly lunch.Type: VegetarianServes: 2 kids (or 1–2 adults)Prep Time: 5 minutesCooking Time: 10 minutesIngredients2 slices soft sandwich bread1 egg1 tsp butter or olive oil1 tbsp mild pesto (store-bought or homemade)1 slice mild cheese (cheddar or mozzarella)Pinch of salt and pepper (optional)Recipe:Heat butter or olive oil in a small pan over medium heat.Crack the egg into the pan and cook to your child’s preference (scrambled or fried).Lightly toast the bread slices.Spread pesto evenly over the toasted bread.Place the cooked egg on one slice and top with cheese.Cover with the other slice and gently press down.Optional: Grill or toast the sandwich for 1–2 minutes to melt the cheese.Slice into halves or fingers for little hands and serve warm.Animal Face Toast Make breakfast or lunch fun with animal face toast. Soft bread topped with colourful spreads, fruits and veggies arranged to look like cute animal faces. Kids will love eating something that’s playful and tasty!Type: VegetarianServes: 2 kidsPrep Time: 5 minutesCooking Time: 2–3 minutesIngredients2 slices soft bread1–2 tbsp cream cheese or hummusSliced fruits (banana, strawberry, kiwi)Sliced veggies (cucumber, carrot, cherry tomato)Optional: raisins or olives for eyesRecipeToast the bread lightly if desired.Spread cream cheese or hummus evenly over the bread.Arrange fruit and veggie slices to create animal faces.Use raisins or olives for eyes and small details.Serve immediately for a fun, colourful snack or lunch.Egg Salad Sandwich This egg salad sandwich is creamy, mild and packed with protein, making it a kid-friendly classic that works perfectly in lunchboxes or as a quick snack.Type: VegetarianServes: 2 kidsPrep Time: 10 minutesCooking Time: 5 minutesIngredients2 slices soft bread2 boiled eggs, chopped1 tbsp mayonnaise or Greek yoghurtPinch of salt and pepper (optional)Optional: finely chopped celery or carrotRecipeBoil eggs, peel and chop finely.Mix eggs with mayonnaise or yoghurt and optional veggies.Spread the egg salad onto one slice of bread.Top with the other slice and press gently.Cut into halves or fingers and serve.Kid Friendly ‘Sushi’ SandwichesTurn lunchtime into a fun activity with kid friendly ‘sushi’ sandwiches — soft bread rolled with colourful fillings like ham, cheese, or veggies for a sushi-inspired treat kids love.Type: Vegetarian or add ham/chicken for proteinServes: 2 kidsPrep Time: 5 minutesCooking Time: 0 minutesIngredients2 slices soft sandwich bread1–2 tsp cream cheese or mild spreadThin slices of ham, cheese or veggies (carrot, cucumber, capsicum)Optional: spinach or lettuceRecipeTrim crusts from bread and flatten with a rolling pin.Spread cream cheese or mild spread evenly.Layer fillings on one edge.Roll bread tightly to form a sushi-like roll.Slice into 1–2 cm pieces and serve.Rainbow Roll-Up SandwichesThese rainbow roll-up sandwiches are packed with colourful veggies and mild spreads, making lunchtime exciting while sneaking in extra nutrition for kids.Type: VegetarianServes: 2 kidsPrep Time: 5 minutesCooking Time: 0 minutesIngredients2 slices soft bread1–2 tsp cream cheese or hummusThin strips of colourful veggies (carrot, capsicum, cucumber, beetroot)Optional: cheese sliceRecipe:Trim crusts and flatten bread slices.Spread cream cheese or hummus evenly.Arrange veggie strips across one edge of the bread.Roll bread tightly to enclose the fillings.Slice into small roll-ups and serve as a fun, colourful snack.TakeawaySandwiches don’t have to be boring, and they definitely shouldn’t be stressful. With a soft bread they love, a few clever fillings, and a bit of creativity, you can turn a simple lunch into a real winner, even for the fussiest eaters.Whether you’re trying out ‘sneaky’ hidden veggies, colourful roll-ups, or even playful animal faces, there are so many ways to keep things nutritious and fun. Plus, with a few quick storage tricks to keep everything fresh and mess-free, you can make mealtimes a total breeze.Give these ideas a go this week and watch your little ones tuck into a lunch that’s just as playful as it is tasty.Ready for more lunchbox inspiration? Check out these Kid-friendly Sausage Rolls for easy, tasty snack ideas your kids will love. Stay informed with fresh tips, expert guidance, unique deals, and tailored support!Click HereMeet Dr Nick FullerMy StoryAs a father, I know first-hand that raising healthy and happy children is tricky. Children are fussy, particularly at the end of the day when they are shattered. We also live in a society where companies seek to profit from what we feed our kids; incorrect and damaging advice is pushed on us and marketed towards our children, and we have no time.But with these recipes and resources, you and your children can enjoy simple and well-founded food and lifestyle choices for lifelong health.

Toddler Meatballs With Vegetables: A Clever Sneaky Healthy Hack
If you’ve ever wished for a single meal that satisfies a hungry toddler and a tired parent at the same time, these toddler meatballs with vegetables are about to become your new best friend. By tucking finely grated veggies into soft, juicy meatballs, you’re serving up a protein-packed meal that’s perfectly sized for little hands but tasty enough for everyone else, too.It turns out that serving veggies alongside or hidden with familiar foods, like a meatball, is one of the easiest ways to help toddlers get comfortable with new flavours. Whether you’re tossing them into a quick pasta sauce or serving them as a finger-food lunch, these are a simple, nutritious way to take the guesswork out of dinner. Help Toddlers Enjoy Nutritious MealsGetting toddlers to eat balanced meals can be tricky, especially when introducing vegetables. Healthy Parents, Healthy Kids by Dr Nick Fuller is full of practical strategies to make mealtimes fun, stress-free, and nutritious. This guide can help children enjoy meals like meatballs with hidden veggies while developing positive eating habits.Turn mealtime battles into happy moments. Grab your copy of Healthy Parents, Healthy Kids today and make healthy eating easier, and more enjoyable, for your little ones.How to Make Your Toddler Meatballs With VegetablesCooking up these toddler-friendly bites is actually quite fun, and it’s the ultimate ‘stealth’ move for getting extra veggies onto their plate. These steps are designed to keep the meatballs soft, juicy, and easy for little hands to manage.Prep time: 15 minutesCook time: 20 minutesMakes: 8 to 10 toddler-sized meatballsWhat You’ll Need:Minced chicken or minced turkey½ cup finely grated carrot¼ cup finely chopped zucchini¼ cup finely chopped onion2 tablespoons finely chopped spinach1 small garlic clove, finely grated2 tablespoons breadcrumbs1 tablespoon milk1 tablespoon olive oilSalt to taste for toddlers over one yearEasy Prep:Wash and finely chop all vegetables.Grate carrot and zucchini very finely so they blend well.Soak breadcrumbs in milk for a minute.The Method:Toss the minced meat into a bowl with your carrot, zucchini, onion, spinach, and garlic.Add the soaked breadcrumbs, olive oil, and salt (if using). Give it a gentle mix until everything is just combined. Don't overwork it, or they can get a bit tough!Roll the mixture into small, toddler-sized balls.Pop them on a lined tray and bake at 180°C until they’re golden and cooked through.The Pan-Fry Option: If you prefer the stove, heat a little oil in a pan. Place the meatballs in gently, cover with a lid, and cook on low heat. Give them a little roll occasionally until they’re cooked all the way through.Ways to Serve Toddler Meatballs With VegetablesOne of the best things about these meatballs is how versatile they are. Whether you’re in a rush or looking for a sit-down family meal, here are a few simple ways to serve them:Serve with PastaToss a few meatballs into a bowl of soft, easy-to-chew pasta like penne or spirals. Add a splash of mild tomato sauce or just a drizzle of olive oil and a sprinkle of cheese. It’s a classic combo that most toddlers already know and love.Serve as Finger FoodIf your toddler is in a ‘finger food’ phase, serve the meatballs on their own with a side of cool Greek yoghurt or a mild hummus. Toddlers love to dip, and this is a great way to encourage self-feeding while keeping the meal interactive and fun.Serve with Mash or RiceFor a more filling dinner, serve the meatballs alongside some fluffy mashed potatoes or soft-cooked rice. You can even smash the meatballs slightly into the mash to make sure every bite includes a bit of everything. This is perfect for those still mastering their fork skills.Final ThoughtsThese toddler meatballs with vegetables are a tasty way to sneak in nutrition without any mealtime battles. Soft, flavourful, and packed with hidden veggies, they’re perfect for lunches, dinners, or even snacks. Give them a try, and watch your little ones happily munch their way through a balanced meal!For more fun, kid-friendly recipes your toddlers will love, check out our other easy ideas like Nutritious Snacks for Young Children, designed to make mealtime stress-free and delicious.Stay informed with fresh tips, expert guidance, unique deals, and tailored support!Click HereMeet Dr Nick FullerMy StoryAs a father, I know first-hand that raising healthy and happy children is tricky. Children are fussy, particularly at the end of the day when they are shattered. We also live in a society where companies seek to profit from what we feed our kids; incorrect and damaging advice is pushed on us and marketed towards our children, and we have no time.But with these recipes and resources, you and your children can enjoy simple and well-founded food and lifestyle choices for lifelong health.
Turn Veggies into Curly Curls with This Spiralised Salad For Kids
Looking for a way to get the kids actually excited about vegetables? This spiralised salad for kids is a total game-changer. Spiralising transforms everyday veggies like zucchini, carrots, and cucumber into fun, curly ‘noodles’ that are just as playful as they are healthy. It turns out that kids are much more likely to tuck into their veggies when they look fun, colourful, and a little bit different.Packed with vitamins, fibre, and a whole rainbow of colours, this salad makes mealtimes way more appealing, and it’s a genius way to sneak some extra nutrients in for picky eaters. In just a few minutes, you can whip up a dish that’s crunchy, bright, and completely kid-friendly. Read on for our best tips on creating an irresistible spiralised salad for kids that even the tiniest taste buds will love.Make Veggies Fun Without the Mealtime BattlesGetting kids to enjoy vegetables doesn’t have to feel like hard work. Healthy Parents, Healthy Kids by Dr Nick Fuller shows parents how playful presentation and positive food experiences can make a real difference. With practical, easy-to-follow strategies, this guide helps children feel curious and confident about trying veggie-based meals without pressure.Turn everyday salads into fun, stress-free meals. Grab your copy of Healthy Parents, Healthy Kids today and help your kids build healthy habits that last.Simple Steps for Your Spiralised Salad For KidsGetting kids involved in the kitchen is all about keeping things simple and hands-on. Before you start, it’s a good idea to prep your veggies and get your tools ready so everything stays stress-free. Spiralising isn't just fast; it adds that ‘magic noodle’ twist that makes kids much more likely to give it a go.What You’ll Need:2 carrots1 cucumber1 apple10-12 cherry tomatoesoptional: salad dressingHow to Make It:Wash the carrots, cucumber, and apple, and peel the carrots with a vegetable peeler.Cut the ends off the fruit and veg to create a flat surface.Attach each one at a time to a spiraliser and spiraliser to create spaghetti-like noodles. If you don't have a spiraliser, you can use a julienne peeler too.Place the spiralised fruit and veggies into a large bowl. Chop the cherry tomatoes in two and add to the bowl. This is entirely optional, but you can add a salad dressing at this stage if you like.Serve immediately.Ways to Serve Your Spiralised Salad For KidsOne of the best things about a spiralised salad is how flexible it is. These fun veggie curls fit easily into everyday meals and can be served in ways that feel familiar and low-pressure for kids.Serve as a side with sandwichesPair spiralised salad with wraps, toasties, or classic lunchbox sandwiches. The crunchy spirals add colour and texture without competing with the main meal, making it less intimidating for fussy eaters.Pack in a lunchbox with a forkSpiralised veggies hold up well in lunchboxes and are easy for little hands to manage. Pop them into a small container with a child-sized fork for a simple, no-fuss school lunch side.Serve chilled on warm daysOn hot days, a chilled spiralised salad feels refreshing and light. Serving it cold can also make veggies more appealing, especially when kids aren’t in the mood for heavier foods.Looking for more easy sides that pair well with kids’ lunches? Explore Salads for Picky Eaters for simple inspiration.Pro-Tips for Your Mini Food CriticsA few small tweaks can make a big difference when serving spiralised salad to children. These tips help keep things fun, manageable, and stress-free at mealtimes.Keep spirals short for easy eating: Long spirals can be tricky for younger kids. Cutting them into shorter lengths makes the salad easier to eat and helps prevent frustration at the table.Use mild dressing flavours: Stick to gentle flavours like olive oil, yoghurt-based dressings, or a light squeeze of lemon. Mild dressings are more likely to be accepted by picky eaters.Let kids help spiral the vegetables: Getting kids involved in spiralising (with safe, age-appropriate tools) builds excitement and curiosity. Kids are often more willing to try foods they’ve helped prepare.Add familiar toppings like cheese or corn: Mixing in well-loved ingredients, such as grated cheese, corn, or even crackers, can help make new veggies feel more familiar and easier for kids to try.Want more tips for helping kids try new foods without pressure? Check out our picky eater–friendly snack recipes to make mealtimes easier.Wrapping UpSpiralised salad for kids is a simple way to turn everyday vegetables into something fun, bright, and way less scary. You can gently help your kids explore new foods, completely stress-free, just by changing the shape, keeping the flavours mild, and serving it alongside things they already love.Whether these veggie curls are tucked into a lunchbox, served with a toastie, or enjoyed as a crunchy treat on a sunny day, they fit perfectly into busy family life. Keep it playful, let the kids get involved, and remember: every little positive bite is a big win for the future!Stay informed with fresh tips, expert guidance, unique deals, and tailored support!Click HereMeet Dr Nick FullerMy StoryAs a father, I know first-hand that raising healthy and happy children is tricky. Children are fussy, particularly at the end of the day when they are shattered. We also live in a society where companies seek to profit from what we feed our kids; incorrect and damaging advice is pushed on us and marketed towards our children, and we have no time.But with these recipes and resources, you and your children can enjoy simple and well-founded food and lifestyle choices for lifelong health.

The Best 3-Ingredient Cheesy Stars Kids Recipe You’ll Make on Repeat
Kids and cheese are a match made in heaven, and these cheesy stars are here to prove it. Made with buttery puff pastry and gooey Cheddar cheese, they’re quick to make, fun to eat, and a guaranteed hit with little hands. Puff pastry gives a light, flaky texture, while the Cheddar adds that familiar, tasty flavour kids love. Studies show that involving kids in simple cooking tasks can boost their willingness to try new foods, making recipes like this both fun and educational. Ready to make snack time sparkle? Keep reading for the full recipe and tips to get those cheesy stars just right!Make Mealtimes Fun with Healthy Eating TipsWe all know that getting kids excited about new foods can feel like a bit of a battle, but it doesn't have to be. In Healthy Parents, Healthy Kids, Dr Nick Fuller shares some brilliant, practical ways to turn simple snacks, like these cheesy stars, into a fun, stress-free experience. It’s all about encouraging healthy habits without the usual mealtime pressure.If you’re ready to turn your family favourites into easy ‘healthy wins’, grab your copy of Healthy Parents, Healthy Kids today. It’s the perfect guide for making every meal a joyful, nourishing moment for the whole family.Your Step-by-Step Cheesy Stars Kids RecipeReady to get the kids in the kitchen? This cheesy stars kids recipe only uses three basic ingredients, which makes it the perfect ‘emergency’ snack for busy afternoons. Here is your quick shopping list:What You’ll Need:375g ready-rolled puff pastry sheet1 egg50g grated cheddar cheeseHow to Make Your Cheesy Stars Sparkle:Preheat the oven to 180 °C and line a baking sheet with greaseproof paper.Roll out the puff pastry sheet onto a floured surface. Use a star-shaped cookie cutter to cut out individual pastry pieces and place them on the baking sheet. Using the egg, apply a thin layer of egg wash to the top of each pasty star and then top with a little cheese.Bake in the oven for 10-12 minutes until the stars are golden.Serve immediately or keep in an airtight container for up to 2 days.Wrapping UpThese Cheesy Stars aren’t just delicious. They’re a fun, hands-on way to get kids excited about food. Flaky puff pastry, gooey Cheddar, and a playful star shape make them perfect for lunchboxes, parties, or after-school snacks. Plus, letting little helpers join in can boost their confidence in the kitchen and spark a lifelong love of cooking.Feeling inspired? Try more kid-friendly treats or snack ideas in our other recipes, and turn snack time into a tasty adventure.Stay informed with fresh tips, expert guidance, unique deals, and tailored support!Click HereMeet Dr Nick FullerMy StoryAs a father, I know first-hand that raising healthy and happy children is tricky. Children are fussy, particularly at the end of the day when they are shattered. We also live in a society where companies seek to profit from what we feed our kids; incorrect and damaging advice is pushed on us and marketed towards our children, and we have no time.But with these recipes and resources, you and your children can enjoy simple and well-founded food and lifestyle choices for lifelong health.

The Easiest 5 Minute Pizza for Kids (With Only 5 Minutes of Prep!)
Kids absolutely love pizza, but let’s be real—who has the time to wait for dough to rise or sauce to simmer on a random Tuesday? We know that most of us reach for prepackaged meals not because we want to, but because juggling a busy schedule and meal planning is just plain hard. That’s where these quick, do-it-yourself pizzas come in. The good news? You can whip up a delicious 5 minute pizza for kids with just a few minutes of prep.With the right shortcuts, bread types, sauces, and toppings, you’ll have a fun, hands-on meal that kids actually want to eat. Keep reading for our favourite tips and ideas to make speedy pizzas that are tasty, nutritious, and fully customisable.Quick, Fun Meals Kids Will Actually EatBusy days don’t have to mean stressful mealtimes. Healthy Parents, Healthy Kids by Dr Nick Fuller shows parents how to make simple, nutritious meals, like 5 minute pizzas, both appealing and healthy. This book features practical strategies to help children enjoy their food while building positive eating habits, all without the mealtime battles.Make fast meals healthy and enjoyable. Grab your copy of Healthy Parents, Healthy Kids today and discover how to turn quick dishes into stress-free, kid-approved meals.How to Make a 5-Minute Pizza for KidsPulling together a 5 minute pizza for kids isn't just a lifesaver for your schedule; it’s also a great way to get them to eat more veggies. By using a few smart shortcuts, you can create a tasty, balanced meal in almost no time at all.Use pre-cooked bread basesPre-cooked bread like pita, English muffins, or flatbreads cooks in minutes and holds toppings without getting soggy. Kids also enjoy the crisp edges and familiar bread textures that make pizzas more appealing. Keep toppings pre-choppedPre-chopping vegetables, fruits, or proteins means you spend less time at the counter during dinner. Having ready-to-eat fruits and veggies on hand can make it easier for you to offer these foods to preschoolers instead of pre-packaged snacks, and kids are more likely to join in and try them. Storing toppings in small containers keeps them organised and makes pizza assembly a fun, hands-on activity.Use a microwave or an air fryerMicrowaves melt cheese quickly, while air fryers give a golden, crispy base in just a few minutes. Children are more likely to eat foods that are hot and visually appealing, which increases overall meal satisfaction. Both options save energy and reduce cooking stress compared to conventional ovens.Choose quick-melting cheeseMozzarella and cheddar are ideal because they melt evenly and create that stretchy, gooey texture kids love. Cheese not only adds flavour but can also hide vegetables. Hidden vegetables increase children’s willingness to eat them. Grating the cheese finely ensures it melts faster, reducing overall cooking time.Let kids assemble their own pizzaInvolving children in meal prep has been linked to better eating habits and increased willingness to try new foods. Kids can spread sauce, sprinkle cheese, and add toppings, which makes them feel empowered and more likely to eat their creations. It also reduces mealtime stress for parents and encourages independent eating.Avoid too many toppingsToo many toppings can make pizzas soggy and extend cooking time. Limiting toppings to 3–4 items per pizza ensures even cooking and keeps textures appealing for kids. Simple combinations also help picky eaters focus on flavours they enjoy, reducing mealtime battles.Simple Recipes for a 5-Minute Pizza for KidsNow that you’ve got the basics down, it’s time to put them into action. These recipes are lifesavers for busy weeknights or after-school snacks because you can have this 5-minute pizza for kids prepped and in the oven before the kids even have time to ask ‘is it ready yet?’Tortilla Pizza Recipe for KidsThis tortilla pizza is a super quick way to satisfy those cravings at home. The base is thin and cooks in minutes, making it perfect for a five-minute pizza idea. Keep it simple or let kids add their favourite toppings. Try capsicum, thinly sliced zucchini, olives, or even roasted pumpkin with a sprinkle of feta for a fun, colourful twist.Type: Vegetarian, Kid Friendly Makes 2 pizzasPrep Time: 5 minutesCooking Time: 10 minutes Ingredients2 wholegrain tortillas or wraps2 tablespoons tomato paste or tomato passata12 cherry tomatoes, halved½ cup mozzarella cheese, gratedFresh basil, to serve Recipe1. Preheat the oven to 200°C. 2. Prepare 2 baking trays, and place 1 tortilla onto each baking tray. 3. Spread the tomato paste evenly onto the tortillas. Top with the sliced tomatoes, and sprinkle cheese over the top. 4. Place the tortillas into the oven and bake for 8-10 minutes until the cheese is melted and golden. 5. Sprinkle over the fresh basil. Use a pizza cutter to slice each pizza into quarters. 6. Serve immediately and enjoy!Weeknight Pizza PartyA fun recipe that is easy and perfect to make for a quick weeknight meal. The recipe can easily be adjusted to serve a larger crowd or dinner for one. It is also designed to allow you to use whatever vegetables and herbs you have in your fridge, and choose to add meat if you wish. You could even make a few pizzas with varying toppings and share them around!Type: Vegetarian/Contains Meat (depending on your topping choices)Serves 4Prep Time: 5 minutesCooking Time: 10-15 minutesIngredients4 wholemeal Lebanese bread wrapsToppings: 4 tablespoons tomato paste1 zucchini, thinly sliced1 red capsicum, diced1 punnet cherry tomatoes, sliced in half¼ cup black olives½ cup shredded mozzarella cheese, or sliced baby bocconcini cheese200g cooked lean meat eg. Shredded chicken breastBasil leaves to serveRecipe1. Preheat the oven to 200°C. Place the Lebanese bread wraps onto two flat baking trays. 2. Spread the tomato paste thinly and evenly over the entire surface of the wrap breads. Ensure you also spread to the edges as this will stop the crust drying out too much.3. Top the wrap breads with all the toppings, then place into the oven. Cook for 10-15 minutes until the toppings are cooked and the cheese is slightly golden. Remove from the oven and slice each pizza into 4-8 pieces and serve.The Best Bread for Quick PizzaWhen you’re aiming for a 5 minute pizza for kids, not all bread is created equal. You want something that toasts up quickly without getting soggy. Here are some of our favourite kid-friendly bases that you probably already have in the pantry:White bread slicesBrown bread slicesEnglish muffinsBurger bunsHot dog bunsPita breadTortilla wrapsBagelsNaan breadReady to pick the perfect base for your five-minute pizza? Check out our guide on which bread to buy at the grocery so you can have tasty, kid-friendly pizzas ready in no time!What Goes on Top of the Bread?The sauce is about more than just flavour. It’s actually a sneaky way to boost their nutrition. Using a tomato-based sauce gives them a hit of lycopene, which is a great little antioxidant for heart health.If you want to keep things interesting, try mixing and matching with these:Pizza sauceTomato ketchupMarinara saucePasta sauceBarbecue sauceAlfredo sauceCheese sauceCream cheese spreadGarlic sauceMayonnaisePesto sauceExtra Toppings Kids Will Love on PizzaToppings are your secret weapon for getting more veggies into their day. Kids are way more likely to try a new vegetable when it’s tucked into something they already love, like pizza.Here are some colourful, familiar ideas to keep everyone happy:Mozzarella cheeseCheddar cheeseSweet cornOlivesCapsicumMushroomsCooked chicken piecesTurkey slicesPineapple piecesSausage slicesOnionTomato slicesQuick tip: Keep toppings organised in small bowls so kids can create their own pizza masterpieces. It encourages independence, reduces mealtime battles, and can even introduce picky eaters to new flavours.For more kid-friendly recipes and fun ideas, check out our Rainbow Pizza for Kids and Pizza Bagels for Kids articles.Summing UpMaking pizza in five minutes isn’t just possible. It can be fun, healthy, and a great way to get kids involved in the kitchen. Choosing the right bread, sauces, and toppings allows you to create colourful, tasty pizzas that children actually want to eat while encouraging them to try new flavours. With these tips and recipes, busy weeknights don’t have to mean processed meals. You can have quick, fresh, and delicious pizzas ready in no time!Stay informed with fresh tips, expert guidance, unique deals, and tailored support!Click HereMeet Dr Nick FullerMy StoryAs a father, I know first-hand that raising healthy and happy children is tricky. Children are fussy, particularly at the end of the day when they are shattered. We also live in a society where companies seek to profit from what we feed our kids; incorrect and damaging advice is pushed on us and marketed towards our children, and we have no time.But with these recipes and resources, you and your children can enjoy simple and well-founded food and lifestyle choices for lifelong health.

The Easy Beginner’s Guide to Making Tasting Trays for Kids
Looking for a fun, fuss-free way to get your kids actually excited about trying new foods? Tasting trays for kids might just be your new secret weapon. These colourful, bite-sized spreads turn snack time into a bit of a mini adventure, letting little ones explore different flavours and textures without any of the usual ‘eat your greens’ pressure.It’s a bigger deal than you might think, too. In 2014–2015, only around 5% of Australian children aged 2–18 years met the recommended daily intake for vegetables, so finding a playful way to bridge that gap is a huge win. Whether it’s crunchy carrots, fruity bites, or a bit of mild cheese and dip, these trays are perfect for picky eaters, parties, or just a random Tuesday lunch.Read on for some easy ideas and tips to create tasting trays for kids that they’ll actually want to dive into, and who knows, they might even find a new favourite along the way.Make Mealtimes a Fun, Stress-Free AdventureIntroducing new foods can definitely be tricky, but tasting trays make the whole process feel like a game rather than a chore. That’s exactly the kind of approach Dr Nick Fuller shares in Healthy Parents, Healthy Kids. The book is packed with practical strategies to help you encourage your kids to explore nutritious foods without the mealtime battles.If you’re ready to turn that curiosity into healthy habits, grab your copy of Healthy Parents, Healthy Kids today. It’s all about making eating fun, engaging, and, most importantly, nourishing for the whole family.Easy-to-Make Tasting Tray Recipes for KidsMaking tasting trays for kids really doesn't need to be a massive production. With just a few bits and pieces from the fridge and a tiny bit of creativity, you can whip up a colourful, bite-sized spread that looks great and actually gets eaten. It’s all about keeping it simple.Healthy Grazing BoardPerfect for kids (and adults too), these boards mix fruits, vegetables, cheeses, dips, and crunchy bites in a way that’s fun to explore. Children are more likely to try new foods when they’re presented in small, varied portions, which makes grazing boards a clever way to boost veggie and fruit intake.Serves2 adults and 2 kidsPrep time 15 minutesIngredientsFresh fruits1 apple sliced thin1 cup grapes1 cup mixed berries1 orange peeled and segmentedFresh vegetables 1 cucumber cut into sticks2 carrots cut into sticks1 cup cherry tomatoes1 bell pepper slicedProteins2 boiled eggs, halved1 cup grilled chicken pieces1 cup paneer cubes½ cup hummusHealthy fats1 ripe avocado sliced¼ cup olives2 tablespoons nut butterCrunchy items 1 cup whole-grain crackers4 rice cakes broken into pieces½ cup roasted chickpeas1 cup plain popcornCheese ½ cup cheddar cubes½ cup mozzarella ballsDips ½ cup Greek yoghurt dip½ cup hummus½ cup guacamolePreparationWash and dry all fruits and vegetablesSlice fruits and vegetables into bite-sized piecesBoil eggs, peel, and cut in halfLightly season grilled chicken with saltToast paneer cubes lightly in a pan if desiredPrepare Greek yoghurt dip with yoghurt and a pinch of saltKeep hummus and guacamole readyAssemblyPlace three small bowls on the board for Greek yoghurt dip hummus, and guacamoleArrange apple slices, grapes, berries, and orange segments on one sidePlace cucumber sticks, carrot sticks, cherry tomatoes, and bell pepper strips near the dipsAdd boiled eggs, grilled chicken, and paneer cubes in the centerPlace avocado slices, olives, and nut butter in small sectionsFill the remaining space with crackers, rice cakes, roasted chickpeas, and popcornFinish by adding cheddar cubes and mozzarella balls evenly around the boardHow to serveServe immediately while everything is freshRefill fruits, vegetables, or dips as neededWorks well as an after-school meal or light dinnerChristmas Wreath Fruit PlatterMake snack time festive with this kid-friendly Christmas wreath fruit platter. Perfect for lunchboxes, playdates, or holiday gatherings, it’s a colourful way to get kids excited about fruit. For easy transport, chop the fruit ahead of time and arrange it into a wreath shape when you’re ready to serve. This healthy snack doubles as a fun activity. Kids can help create the wreath. You can mix and match seasonal fruit and make the wreath any size to suit your little ones.Type: Vegetarian, Vegan, Gluten Free, Lactose Free, Kid Friendly Makes 1 wreathPrep Time: 10 minutes Cooking Time: 0 minutes IngredientsAssorted selection of fresh seasonal fruit, chopped into varying sizes. (We chose watermelon, rock melon, honeydew melon, strawberries, cherries, raspberries, and blackberries)Sprigs of fresh mint, to serve Recipe1. Choose a large circular serving plate. Begin by arranging pieces of chopped melon and strawberries into a circular shape around the border of the plate. 2. Top with the smaller pieces of fruit and berries, filling in the gaps until you have created a thick wreath shape fruit arrangement. 3. An optional step to add some extra festive decoration is to slice the watermelon, rock melon, and/or honeydew melon into stars, using a star shaped cookie cutter. Arrange the stars on top of the wreath. 4. Top the fruit wreath with some sprigs of fresh mint. Serve immediately and enjoy!Benefits of Tasting TraysTasting trays aren’t just cute and colourful. They actually offer a bunch of benefits for kids and parents.Encourages kids to try new foodsOffering a variety of foods increases the likelihood that children will choose and eat something they might otherwise skip. One study found kids were far more likely to select food when offered a variety rather than a single item. Reduces mealtime pressureNo more forcing bites or battles at the table. Tasting trays turn eating into a playful experience, so kids can choose what and how much to eat without stress.Supports independent eatingWith everything laid out in easy-to-grab pieces, kids can serve themselves and practice decision-making skills and feel proud of their choices.Helps with picky eating phasesRepeated exposure to new foods through small tastes, and without pressure, can increase acceptance over time. Offering tiny servings repeatedly helps kids get used to new tastes.Builds positive food habits earlyEarly food exposure and variety are linked with broader taste preferences later in life, giving kids a better chance to enjoy a diverse diet as they grow.Improves food variety exposureA colourful tray packed with fruits, veggies, proteins, and healthy fats gives kids exposure to different nutrients, textures, and flavours, a key factor in balanced diets.Makes meals more enjoyableEating becomes an experience rather than a chore. A visually appealing tray turns a snack or lunch into something kids actually look forward to.Reduces food wasteSmall portions mean kids can try what they like without leaving untouched piles of food behind — a win for both nutrition and your wallet.Tips to Build Balanced Tasting TraysCreating a tasting tray that’s both fun and nutritious is easier than you think. Here’s how to get started:Include at least one familiar food: Start with something your child already enjoys. This gives them a sense of comfort and increases the likelihood they’ll try the new items.Add one new or less liked food: Pair a familiar favourite with a new or previously rejected food. Repeated low-pressure exposure can help kids accept it over time.Balance fruits, vegetables, proteins, and fats: Aim for a mix of colours and nutrients. Think carrot sticks, cheese cubes, berries, and hummus for a well-rounded tray.Keep portions small and manageable: Tiny bites reduce overwhelm and make it easier for kids to taste everything without filling up too fast.Mix soft and crunchy textures: Varying textures keeps trays interesting and helps children develop sensory awareness.Use colourful foods: Bright reds, oranges, greens, and purples naturally attract kids and make the tray visually fun.Avoid overcrowding the tray: Leave a little space between items. Overcrowding can be overwhelming and make it hard for kids to pick what they want.Rotate foods regularly: Switch up fruits, vegetables, dips, and proteins to keep mealtimes exciting and ensure kids get exposure to a wide range of nutrients.Looking for even more tasty bites? Explore our Finger Food Dinners for Kids to add fun, healthy options to your next tray.Wrapping UpTasting trays are more than just a colourful snack. They’re a simple, stress-free way to encourage kids to try new foods, explore flavours, and build healthy eating habits early. With small portions, a mix of familiar favourites and new bites, and a little creativity, you can turn snack time into a fun adventure for little ones. Plus, they’re perfect for parties, lunchboxes, or even quiet afternoons at home.So grab a tray, gather some fruits, veggies, proteins, and healthy dips, and watch your kids dive in with curiosity and excitement. Don’t forget to check out our other kid-friendly recipe ideas like Chicken Wrap for Kids or Fish Fingers for Kids for even more inspiration to make mealtime fun!Stay informed with fresh tips, expert guidance, unique deals, and tailored support!Click HereMeet Dr Nick FullerMy StoryAs a father, I know first-hand that raising healthy and happy children is tricky. Children are fussy, particularly at the end of the day when they are shattered. We also live in a society where companies seek to profit from what we feed our kids; incorrect and damaging advice is pushed on us and marketed towards our children, and we have no time.But with these recipes and resources, you and your children can enjoy simple and well-founded food and lifestyle choices for lifelong health.

The 10-Minute Christmas Sandwiches for Kids for a Jolly Lunch
Christmas food for kids doesn’t need to be fancy, stressful, or ‘Pinterest-perfect’ to be a total hit. The truth is, when kids get to help out with a bit of simple meal prep, they’re usually much more excited to actually eat what they’ve made, which is exactly why Christmas sandwiches for kids are such a winner during the silly season. They’re easy to build, fun to decorate, and familiar enough to keep even the fussiest eaters happy.Yes, a humble sandwich really can be Christmassy! Think festive shapes, bright fillings, and all those kid-approved flavours, without having to force anything new or ‘weird’ onto their plate. If your little one already loves wraps or bagels, this is the easiest way to add a bit of holiday magic without the mealtime meltdown.Read on for our favourite breads to use, kid-friendly fillings, and some simple decorating tips that your little helpers can get stuck into, too.Make Festive Meals Fun and HealthyHoliday food doesn’t have to mean a total sugar overload or a constant battle at the table. In Healthy Parents, Healthy Kids, Dr Nick Fuller shows you how to turn festive meals, like these Christmas sandwiches for kids, into healthy, relaxed experiences. His practical tips are all about helping children explore nutritious foods while keeping the holiday spirit alive.If you want to enjoy your holiday cooking without the stress, grab your copy of Healthy Parents, Healthy Kids today. It’s a game-changer for making Christmas meals fun, balanced, and memorable for the whole family.Pick Your Base: The Best Bread Types to UseThe bread sets the foundation for any kid-friendly sandwich. Softer textures and mild flavours tend to work best, especially for younger or selective eaters.White BreadA classic favourite. White bread is soft, neutral and perfect for cutting into festive shapes using cookie cutters. It’s ideal if your child prefers very familiar flavours and textures that they will be more willing to try.Milk BreadLightly sweet and extra fluffy, milk bread feels special without tasting different. It works beautifully for both savoury and sweet Christmas sandwiches. Milk-based breads also naturally provide small amounts of calcium and protein, which are important nutrients for growing kids.Whole Wheat BreadWhole wheat bread is a good option if your child is already comfortable with whole grains. It has a slightly firmer texture but still works well for Christmas sandwiches when paired with simple fillings. Whole grains naturally contain dietary fibre, which supports digestion and can help kids feel fuller for longer, especially helpful during busy, snack-heavy Christmas days.Multigrain BreadMultigrain bread offers a mix of grains and seeds, adding more texture and variety. It’s usually best suited to less fussy eaters, but cutting it into festive shapes can help boost appeal. Regular exposure to different grains may help children become more accepting of new textures over time, even if they don’t love them straight away.Brioche BreadSoft, buttery and slightly sweet, brioche bread feels extra special, perfect for Christmas lunches or party platters. Because it’s made with eggs and milk, brioche contains small amounts of protein and fat, which can help add energy and satiety, making it a filling option for growing kids.Mini Sandwich RollsMini sandwich rolls are ideal for small hands and make sandwiches feel more fun and manageable. Offering food in smaller portions can reduce pressure at mealtimes, which may encourage kids to eat more willingly, especially during busy or exciting occasions like Christmas.Burger BunsBurger buns are soft, familiar and easy to slice into festive mini sliders. Their mild flavour makes them a safe choice for kids who prefer predictable foods. Familiar bread choices can help kids feel more comfortable trying different fillings, even during high-energy events like parties.Dinner RollsDinner rolls are often already part of Christmas meals, making them a familiar and comforting option for kids. Familiar foods play an important role in food acceptance, particularly for fussy eaters, helping them feel relaxed and confident at the table.Still not sure which bread to choose at the supermarket? Check out this simple guide.Filling Ideas for Christmas SandwichesKeeping fillings familiar is key. Kids are more likely to accept foods they recognise, even when presented in a new or festive way, which makes sandwiches ideal for Christmas.Savoury fillingsCheese slices – mild and reliableCream cheese – smooth and easy for texture-sensitive kidsPaneer slices – gentle flavour and soft biteGrilled chicken – shredded or finely choppedTurkey slices – a classic Christmas optionBoiled egg mash – creamy and fillingThese fillings work well if your child already enjoys simple meals like Finger Food Dinners for Kids or plain wraps.Fresh add-insCucumber slices – thin and seedless for best acceptanceTomato slices – deseeded for a softer textureLettuce – finely shreddedSweet corn – naturally sweet and colourfulSweet sandwich optionsJam – perfect for Christmas morning or partiesNut butter – only if nut-safe and age-appropriateSweet sandwiches pair nicely with festive treats like our Easter Treats for Kids, especially for holiday-style lunches.Healthy Salad Sandwich Recipe for KidsThis salad sandwich is a simple, kid-friendly Christmas sandwich that keeps flavours familiar. Creamy avocado works as a mild spread, holding everything together without overpowering the filling, and it’s easy to customise with gentle add-ins for fussy eaters.Type: Lactose Free, Vegetarian/Vegan Option, Kid Friendly Serves 2Prep Time: 10 minutesCooking Time: 0 minutes Ingredients4 slices wholegrain bread1 avocado1 large tomato, sliced2 cups mixed lettuce leaves100g grilled chicken breast OR 100g grilled tofu OR 2 boiled eggs, sliced1 carrot, gratedRecipe1. Mash the avocado and spread onto each of the four slices of bread.2. Top two of the slices of bread with the tomato, then the mixed lettuce leaves, the protein of your choice, and then the grated carrot. Push down firmly to secure all the ingredient layers in place. 3. Top each sandwich with the remaining slices of bread. 4. Press down firmly and use a serrated knife to cut each sandwich in half, or into quarters for kids. 5. Serve immediately and enjoy.Easy Ways to Decorate Christmas SandwichesDecorating is where Christmas sandwiches really come alive, and you don’t need to overdo it.Use cookie cutters to create stars, trees or bellsAdd cherry tomato pieces for festive red colourUse cucumber or lettuce for Christmas greenCreate faces with olives or corn for playful designsKeep decorations simple and fully edibleUse toothpicks with care, and only for older kidsVisual appeal can increase willingness to try foods, but overly busy designs can overwhelm fussy eaters. Simple, fun and familiar works best.Final ThoughtsChristmas sandwiches for kids are an easy win during the busy holiday season. With soft breads, familiar fillings, and simple decorations, you can create festive meals that feel special without causing mealtime stress. They’re perfect for Christmas parties, school celebrations or relaxed holiday lunches at home, especially when paired with other kid favourites like wraps, bagels or finger foods.Stay informed with fresh tips, expert guidance, unique deals, and tailored support!Click HereMeet Dr Nick FullerMy StoryAs a father, I know first-hand that raising healthy and happy children is tricky. Children are fussy, particularly at the end of the day when they are shattered. We also live in a society where companies seek to profit from what we feed our kids; incorrect and damaging advice is pushed on us and marketed towards our children, and we have no time.But with these recipes and resources, you and your children can enjoy simple and well-founded food and lifestyle choices for lifelong health.
No-Fuss Avocado Recipes for Kids Who Are Serious Fussy Eaters
If you’ve ever bought a perfectly ripe avocado only to have your child stare at it like it’s an alien life form, it’s a bit of a classic parenting moment. We know avocado is one of those nutrient-dense foods that we love to see on the plate, but kids, especially the serious fussy eaters, tend to be a bit more skeptical.There is a brilliant reason it keeps popping up in nutrition advice, though. It turns out that kids who regularly eat avocado usually have a much higher diet quality overall. It’s not just about the ‘healthy fats.’ Avocado actually helps fill those common nutrient gaps by packing in fibre and potassium. Basically, it’s a bit of a nutritional powerhouse that does a lot of the heavy lifting for you.In this article, we’re breaking down exactly why it’s so good for them, plus some practical, no-pressure tips to help your kids accept it without mealtimes turning into a negotiation. Keep reading for simple ways to make avocado less scary and more snack-worthy.Helping Kids Love Healthy Fats Without the FussAvocado is packed with goodness, but getting kids to actually enjoy the texture can be a bit of a mission. That’s where Healthy Parents, Healthy Kids by Dr Nick Fuller comes in. It’s a great resource for parents who want to introduce nutritious foods in a way that feels relaxed and pressure-free.Instead of forcing bites, Dr Fuller’s approach focuses on building a positive relationship with food, which makes mealtimes calmer for everyone. If you’re ready to see how healthy eating can actually work for real family life, grab your copy of Healthy Parents, Healthy Kids today.Why Avocado Is a Total Win for Growing KidsAvocados aren’t just trendy brunch food. They’re packed with nutrients that support growing bodies and busy little brains. Here’s why they’re worth keeping on your child’s plate (or at least nearby):Healthy fats for brain developmentAvocados are rich in monounsaturated fats, which play an important role in brain development during childhood. Research shows that healthy fats support cognitive function and help the body absorb fat-soluble vitamins more efficiently. For kids who are constantly learning, moving and growing, these fats help fuel both body and brain.Supports steady energy levelsUnlike sugary snacks that can cause rapid rises and falls in blood sugar, avocado’s fat and fibre content may support steadier energy levels. The combination of healthy fats and fibre helps keep blood sugar levels steadier, which may support better focus and fewer mid-afternoon meltdowns.Rich in fibre for digestionOne medium size avocado contains 3.4 g of dietary fibre, a surprisingly high amount. Fibre supports gut health, helps prevent constipation and promotes regular digestion, all common concerns for young kids. Many children fall short of their daily fibre needs, so adding avocado to meals can be an easy win.Contains vitamins A, C, E, and KAvocados provide a mix of essential vitamins that support immunity, vision, skin health and normal blood clotting. Vitamin E, in particular, acts as an antioxidant, helping protect cells from damage.These nutrients are especially important during early childhood when the immune system is still developing.Provides potassium for muscle functionAvocados contain more potassium than bananas gram for gram. Potassium supports muscle function, nerve signals and fluid balance, all crucial for active kids who are constantly on the move.Helps kids feel full longerBecause avocado contains both fat and fibre, it can help kids feel satisfied after eating. This may reduce constant snacking and help keep hunger levels more balanced between meals.Tips to Prepare Avocado for Fussy KidsAvocado’s biggest challenge? Texture, colour and unfamiliar taste. These tips focus on reducing novelty and increasing acceptance, two big wins for picky eaters.Mix avocado with familiar foods: Instead of serving avocado on its own, mix it into foods your child already loves. Think mashed avocado stirred into scrambled eggs, blended into smoothies, or spread thinly under cheese on toast. Familiar flavours make new foods feel safer.Keep seasoning mild: Strong flavours can be overwhelming for kids. Skip chilli, garlic or onion and stick with mild seasonings like a tiny pinch of salt or nothing at all. Let kids experience the natural taste first.Mash avocado until smooth: Lumpy or chunky textures can be a deal-breaker for fussy eaters and sensory sensitive children. Mash avocado until completely smooth or blend it into dips, sauces or spreads for a more predictable texture.Serve in small portions: A huge scoop of green food can feel intimidating. Start with a small amount, even a teaspoon is enough. Smaller portions feel less risky and reduce pressure to finish it.Pair with bread or crackers: Avocado is often better accepted when paired with crunchy or familiar foods. Spread it thinly on toast, rice crackers or sandwiches to make it feel more like a topping than a main ingredient.Use fun shapes or spreads: Cut toast into fun shapes, swirl avocado into patterns, or let kids spread it themselves. Visual appeal and control can increase willingness to try new foods.Offer repeatedly without pressure: Food acceptance takes time. Studies show kids may need to be exposed to a new food 8-10 times or more before accepting it. Keep offering avocado casually, without bribing, forcing or commenting too much. Even touching or licking counts as progress.Our Favourite Easy Avocado Recipes for KidsNow that we’ve covered why they’re such a powerhouse, the real trick is making them look like something the kids actually want to eat. The good news? Avocados are surprisingly versatile. It works just as well hidden in a sweet snack as it does in a savoury meal. Here are a few ways to get started:Haloumi, Beetroot and Avocado SaladThis colourful salad is a kid-friendly way to introduce avocado in a familiar, filling meal. The creamy avocado helps balance the saltiness of haloumi and the natural sweetness of beetroot, making the flavours mild and approachable for younger taste buds. It’s nutritious, satisfying and works well as a light family meal or a shared plate for kids who are learning to accept new foods.Type: Vegetarian, Gluten FreeServes 4Prep Time: 5 minutesCooking Time: 20 minutesIngredients1 cup quinoa1 teaspoon olive oil½ block haloumi, chopped into bite-sized pieces 3 peeled cooked baby beetroot, chopped 1 cucumber, diced1 avocado, diced 1 packet baby spinach Recipe1. Cook quinoa in a deep sided frying pan according to packet directions. When cooked, remove from the pan and divide between four bowls.2. Re-using the same pan, add olive oil and heat over medium heat. Once hot add the haloumi and cook for a couple of minutes on each side until golden. 3. Add the chopped beetroot, cucumber and avocado to the bowls. Add a big handful of spinach to each and top with cooked haloumi. Enjoy!Best Ever Salad SandwichThis salad sandwich is a simple, kid-friendly way to include avocado in an everyday lunch. Creamy avocado works perfectly as a spread, helping hold everything together while adding healthy fats without overpowering the flavours. Sandwiches are a familiar, low-pressure option for kids, and you can easily customise this one with mild additions like cheddar cheese, tinned beetroot or a thin smear of hummus to suit fussy eaters.Type: Lactose Free, Vegetarian/Vegan Option, Kid Friendly Serves 2Prep Time: 10 minutesCooking Time: 0 minutes Ingredients4 slices wholegrain bread1 avocado1 large tomato, sliced2 cups mixed lettuce leaves100g grilled chicken breast OR 100g grilled tofu OR 2 boiled eggs, sliced1 carrot, gratedRecipe1. Mash the avocado and spread onto each of the four slices of bread.2. Top two of the slices of bread with the tomato, then the mixed lettuce leaves, the protein of your choice, and then the grated carrot. Push down firmly to secure all the ingredient layers in place. 3. Top each sandwich with the remaining slices of bread. 4. Press down firmly and use a serrated knife to cut each sandwich in half, or into quarters for kids. 5. Serve immediately and enjoy.Once avocado is on the menu, it opens the door to more fresh foods. These Innovative Salad Ideas for Kids That Make Veggies Fun show how to keep things colourful, tasty, and kid-approved.Final ThoughtsAvocado doesn’t have to be a battle food. With its impressive nutritional profile and endless ways to prepare it, avocado can slowly become a familiar, low-stress option for kids, even the fussiest ones. Start small, keep it pressure-free and remember: exposure matters more than perfection.Stay informed with fresh tips, expert guidance, unique deals, and tailored support!Click HereMeet Dr Nick FullerMy StoryAs a father, I know first-hand that raising healthy and happy children is tricky. Children are fussy, particularly at the end of the day when they are shattered. We also live in a society where companies seek to profit from what we feed our kids; incorrect and damaging advice is pushed on us and marketed towards our children, and we have no time.But with these recipes and resources, you and your children can enjoy simple and well-founded food and lifestyle choices for lifelong health.
Protein Yoghurt For Kids: Why This Creamy Snack Is Great for Growing Bodies
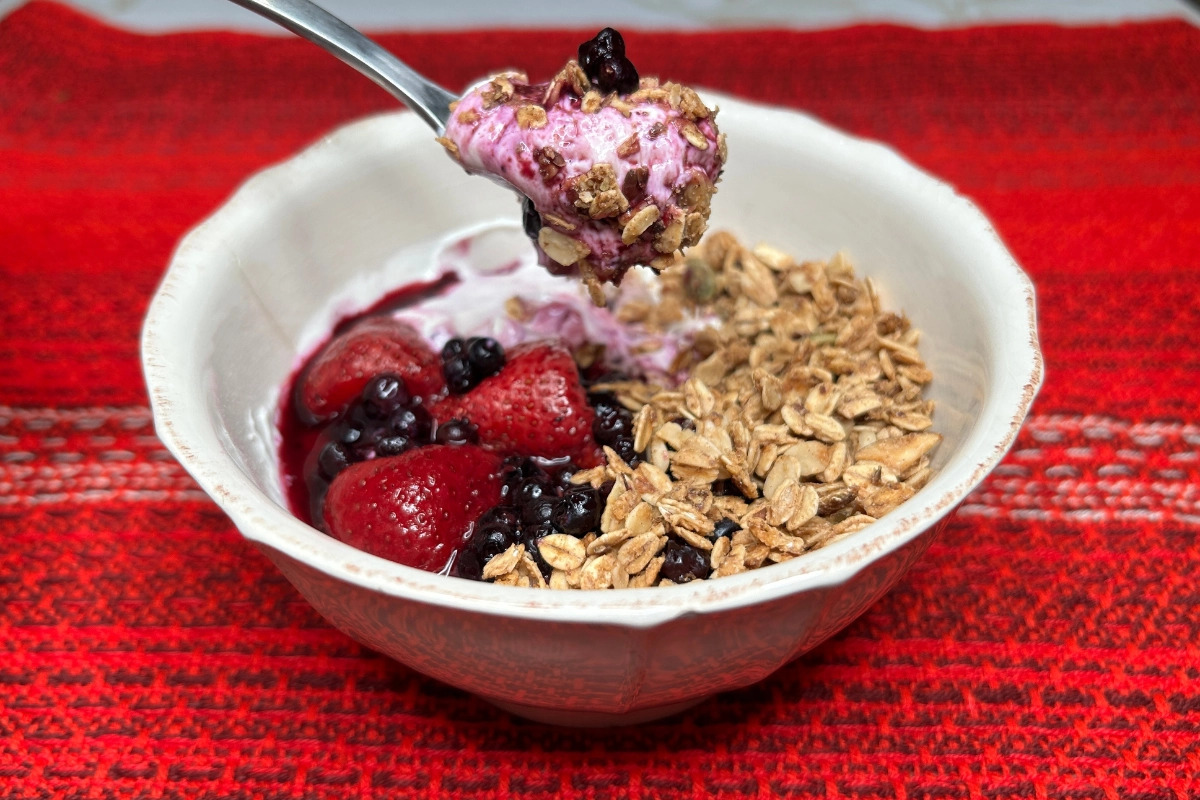
Looking for a snack that’s yummy and genuinely good for your kids? Protein yoghurt is an easy win. It’s creamy, kid-friendly, and loaded with protein, calcium and other nutrients that support growth, energy and day-to-day development. Research backs this up too, showing that kids and teens need adequate protein for both physical and cognitive growth while still keeping overall intake balanced to avoid long-term risks like overweight or obesity.Protein yoghurt made from animal-based proteins offers a high-quality source of essential amino acids that growing bodies rely on for strong muscles, bones and organs. Plant-based versions can still be a good choice, but they often need a bit more care to fill potential nutrient gaps because plant proteins are less digestible and may not provide all amino acids. Adding protein yoghurt to your child’s routine gives them a steady, tasty source of protein and micronutrients that help keep energy levels more consistent. It also makes snack time feel both fun and nourishing.If you’re ready to turn everyday snacks into something delicious and genuinely helpful for growing kids, read on for the benefits, tips and easy serving ideas.Boost Nutrition the Easy WayEncouraging children to eat protein-rich snacks can be simple with the right approach. Healthy Parents, Healthy Kids by Dr Nick Fuller shows parents how to turn foods like protein yoghurt into fun, appealing options, helping kids enjoy nourishing meals without battles.Grab your copy of Healthy Parents, Healthy Kids today and discover stress-free ways to boost your child’s nutrition.What Is Protein Yoghurt? Protein yoghurt is basically your regular yoghurt with a little extra muscle, thanks to added protein from milk, Greek yoghurt, or plant-based alternatives. Unlike many kid-targeted yoghurts that are high in sugar and low in anything truly helpful, protein yoghurt is made to keep little tummies fuller for longer while still giving that creamy, delicious flavour kids love. Higher-protein yoghurt can help improve satiety, support muscle development and even contribute to steadier energy throughout the day.If your child follows a plant-based diet, there are fortified options too. Just make sure they provide all the essential amino acids and key micronutrients, since plant proteins can be a bit harder for the body to absorb. Why Protein Yoghurt Is Great for KidsFrom growth to energy, here’s why adding protein yoghurt for kids stands out:High in protein for growthProtein is essential for growing bodies, supporting the development of muscles, tissues, and even hair and nails. A serving of protein yoghurt contributes significantly to a child’s daily protein needs. Research shows that milk protein in yoghurt can help maintain muscle mass and support skeletal growth in children, making it a powerful growth-promoting snack.Supports strong bones and teethProtein yoghurt is naturally rich in calcium, which works together with protein to strengthen bones and teeth. Adequate calcium intake during childhood lays the foundation for lifelong skeletal health, while also supporting proper nerve function and muscle contraction.Keeps kids full longerProtein slows digestion and prolongs satiety, helping kids feel fuller between meals. This can reduce the tendency to snack on less nutritious foods, making protein yoghurt a perfect option for busy mornings or long school days.Aids in muscle developmentMilk protein in yoghurt provides the essential building blocks for muscle repair and growth, which is especially important for active kids who need steady energy and support for their growing muscles. Even small daily servings, combined with play or exercise, can promote healthy muscle development over time.Provides a reliable source of calciumBeyond bones and teeth, calcium from protein yoghurt contributes to important bodily functions, including nerve signalling and muscle movement. A regular serving ensures your child consistently gets this vital nutrient.Boosts energy levelsProtein yoghurt helps keep energy levels steady. According to a study, high-protein yoghurt, whether enriched with whey or alpha-lactalbumin, can improve protein balance and reduce hunger. This helps children maintain consistent energy and feel fuller for longer compared with lower-protein options.Encourages healthy eating habitsIntroducing protein-rich snacks early teaches kids to enjoy foods that nourish their bodies. Regularly enjoying protein yoghurt helps normalise healthy choices and encourages lifelong nutritious eating patterns.How to Choose the Right Protein YoghurtNot all protein yoghurts are created equal, so it pays to know what to look for:Check the sugar contentSome yoghurts aimed at kids are packed with sugar, which can undo the nutritional benefits. Choose options with minimal added sugar to keep the snack wholesome.Look for natural ingredientsCheck labels for real, natural ingredients rather than long lists of additives. Natural yoghurts tend to provide more nutritional value and fewer unnecessary extras.Choose plain or lightly flavored optionsPlain or lightly flavoured yoghurts give you more control over sugar content while still tasting great. You can always add fresh fruit or a drizzle of honey for natural sweetness.Avoid artificial colors or sweetenersArtificial additives may appeal to kids visually but offer little to no nutritional benefit. Stick to products that avoid these chemicals for a cleaner, healthier snack.Pick age-appropriate portionsServing sizes should match your child’s age and appetite. Too much can contribute to unnecessary calories, while too little may not be satisfying. Age-appropriate portions ensure your child gets the benefits without overdoing it.If you’re unsure which yoghurt to choose for your child, this video can help guide you. It explains what to look for in a nutritious yoghurt and how to pick a tasty option your kids will enjoy. Watch and make snack time both healthy and delicious.Homemade Protein Yoghurt IdeasHomemade protein yoghurt is a fun, flexible way to boost your child’s protein intake while letting you control the flavours and ingredients. Here are some easy and delicious ideas to get you started.Greek yoghurt with nut butterCreamy, protein-packed and totally customisable, this Greek yoghurt with nut butter is a quick, satisfying snack for kids. It’s perfect for breakfast, after-school munching or a mid-morning energy boost.Type: High protein, vegetarian, gluten freeServes: 1–2 kidsPrep Time: 5 minutesCook Time: 0 minutesIngredients1 cup Greek yoghurt1–2 tbsp peanut butter, almond butter, or cashew butter1 tsp honey or maple syrup (optional, for kids over 1 year)½ tsp cinnamon (optional)Fresh fruit or berries for toppingRecipeSpoon the Greek yoghurt into a bowl.Swirl through nut butter until evenly mixed.Drizzle lightly with honey or maple syrup if desired.Sprinkle it with cinnamon and top with fresh fruit or berries.Serve immediately, or store in the fridge for up to a day for a quick grab-and-go snack.Yoghurt and chia seed blendA simple, nutrient-packed snack that’s creamy, slightly crunchy and full of protein and fibre. This yoghurt and chia seed blend is perfect for breakfast, lunchboxes or an after-school energy boost.Type: High protein, vegetarian, gluten freeServes: 1–2 kidsPrep Time: 5 minutesCook Time: 0 minutes (plus optional 15–20 minutes for chia to swell)Ingredients1 cup Greek yoghurt1–2 tsp chia seeds½ tsp vanilla extract (optional)1 tsp honey or maple syrup (optional, for kids over 1 year)Fresh fruit or berries for toppingRecipeSpoon Greek yoghurt into a bowl.Stir in chia seeds and vanilla extract if using.Drizzle lightly with honey or maple syrup for natural sweetness.Let sit for 15–20 minutes if you want the chia seeds to swell for a thicker texture (optional).Top with fresh fruit or berries and serve immediately, or store in the fridge for a grab-and-go snack.Banana yoghurt smoothie bowl Thick, creamy and naturally sweet, this banana yoghurt smoothie bowl is a fun, protein-packed breakfast or snack for kids. Top with fruit or seeds for extra texture and nutrition.Type: High protein, vegetarian, gluten freeServes: 1–2 kidsPrep Time: 5 minutesCook Time: 0 minutesIngredients1 ripe banana¾ cup Greek yoghurt¼ cup milk or plant-based milk1 tsp honey or maple syrup (optional, for kids over 1 year)Toppings: sliced fruit, berries, chia seeds, granola (optional)RecipeIn a blender, combine banana, Greek yoghurt, milk and honey if using. Blend until smooth and creamy.Pour into a bowl.Top with sliced fruit, berries, chia seeds or granola as desired.Serve immediately with a spoon for a fun, colourful, protein-packed snack.Berry yoghurt whipLight, fluffy and packed with fruity flavour, this berry yoghurt whip is a fun way to get kids eating more protein and fruit. Perfect for breakfast, snack time, or a healthy dessert alternative.Type: High protein, vegetarian, gluten freeServes: 1–2 kidsPrep Time: 5 minutesCook Time: 0 minutesIngredients1 cup Greek yoghurt½ cup mixed berries (fresh or thawed if frozen)1 tsp honey or maple syrup (optional, for kids over 1 year)1–2 tsp chia seeds or flaxseeds (optional)RecipePlace Greek yoghurt and berries in a bowl.Using a fork or small whisk, lightly mash and mix until combined but still slightly chunky.Drizzle with honey or maple syrup if desired.Stir in chia or flaxseeds for extra fibre and omega-3s.Serve immediately or chill for 5–10 minutes for a slightly firmer texture.Yoghurt with oats and seedsA hearty, protein-packed snack that combines creamy yoghurt, chewy oats and crunchy seeds. Perfect for breakfast, after-school fuel, or a healthy dessert that keeps kids full and energised.Type: High protein, vegetarian, gluten free if using GF oatsServes: 1–2 kidsPrep Time: 5 minutesCook Time: 0 minutesIngredients1 cup Greek yoghurt2 tbsp rolled oats (or quick oats)1 tsp chia seeds1 tsp flaxseeds or sunflower seeds½ tsp honey or maple syrup (optional, for kids over 1 year)Fresh fruit for topping (optional)RecipeSpoon Greek yoghurt into a bowl.Stir in rolled oats, chia seeds, and flax or sunflower seeds.Drizzle lightly with honey or maple syrup if desired.Top with fresh fruit for extra flavour and colour.Serve immediately, or let sit for a few minutes for oats to soften slightly.Chocolate protein yoghurtCreamy, chocolaty and packed with protein, this yoghurt is a fun way to sneak in some extra nutrition. Perfect for breakfast, after-school snacks or a quick, satisfying treat.Type: High protein, vegetarian, gluten freeServes: 1–2 kidsPrep Time: 5 minutesCook Time: 0 minutesIngredients1 cup Greek yoghurt1 tsp cocoa powder1 tsp honey or maple syrup (optional, for kids over 1 year)1–2 tsp chia seeds or flaxseeds (optional)Mini chocolate chips or cacao nibs for topping (optional)RecipeSpoon Greek yoghurt into a bowl.Stir in cocoa powder and honey or maple syrup until smooth and evenly mixed.Add chia seeds or flaxseeds if desired for extra nutrition.Top with mini chocolate chips or cacao nibs for fun texture.Serve immediately, or chill for a thicker, creamier texture.Easy Ideas to Enjoy Protein YoghurtProtein yoghurt is versatile, and getting creative with toppings can make it more appealing for kids. Mix textures, colours, and flavours to turn a simple snack into an exciting treat:Add fresh fruit: Strawberries, blueberries, kiwi, or banana slices add natural sweetness, vibrant colour, and extra vitamins.Mix with granola or nuts: Adds crunch, texture variety, protein, fibre, nd healthy fats.Blend into smoothies: Combine with fruits like berries or mango, a splash of milk, and even spinach for a quick, nutrient-rich drink.Freeze into yoghurt pops: Layer with fruit or drizzle honey before freezing for a fun, cool snack.Use as a dip for fruit: Apple slices, strawberries, or pear chunks make snack time interactive.Layer in a parfait jar: Combine yoghurt, fruit, granola, and a drizzle of honey for a visually appealing, make-ahead snack.Stir in honey or nut butter: Adds natural sweetness, richness, and extra protein and healthy fats.Want more simple, protein-packed ideas for kids? Check out our Quick 5-Ingredient Meals For Picky Eaters That Are A Sure Hit.Final ThoughtsProtein yoghurt might be simple, but it’s a seriously smart snack! Creamy, versatile, and kid-approved, it can be enjoyed as smoothies, parfaits, frozen pops, or even fun dips. Toss in some fruit, a sprinkle of nuts, or a drizzle of honey, and you’ve got snacks that kids actually love and parents feel good about. Adding protein yoghurt to your child’s routine is an easy tweak that makes a big difference for growth, energy, and happy, healthy habits.Stay informed with fresh tips, expert guidance, unique deals, and tailored support!Click HereMeet Dr Nick FullerMy StoryAs a father, I know first-hand that raising healthy and happy children is tricky. Children are fussy, particularly at the end of the day when they are shattered. We also live in a society where companies seek to profit from what we feed our kids; incorrect and damaging advice is pushed on us and marketed towards our children, and we have no time.But with these recipes and resources, you and your children can enjoy simple and well-founded food and lifestyle choices for lifelong health.